Free Trailer Inspection PDF Template
Free Trailer Inspection PDF Template
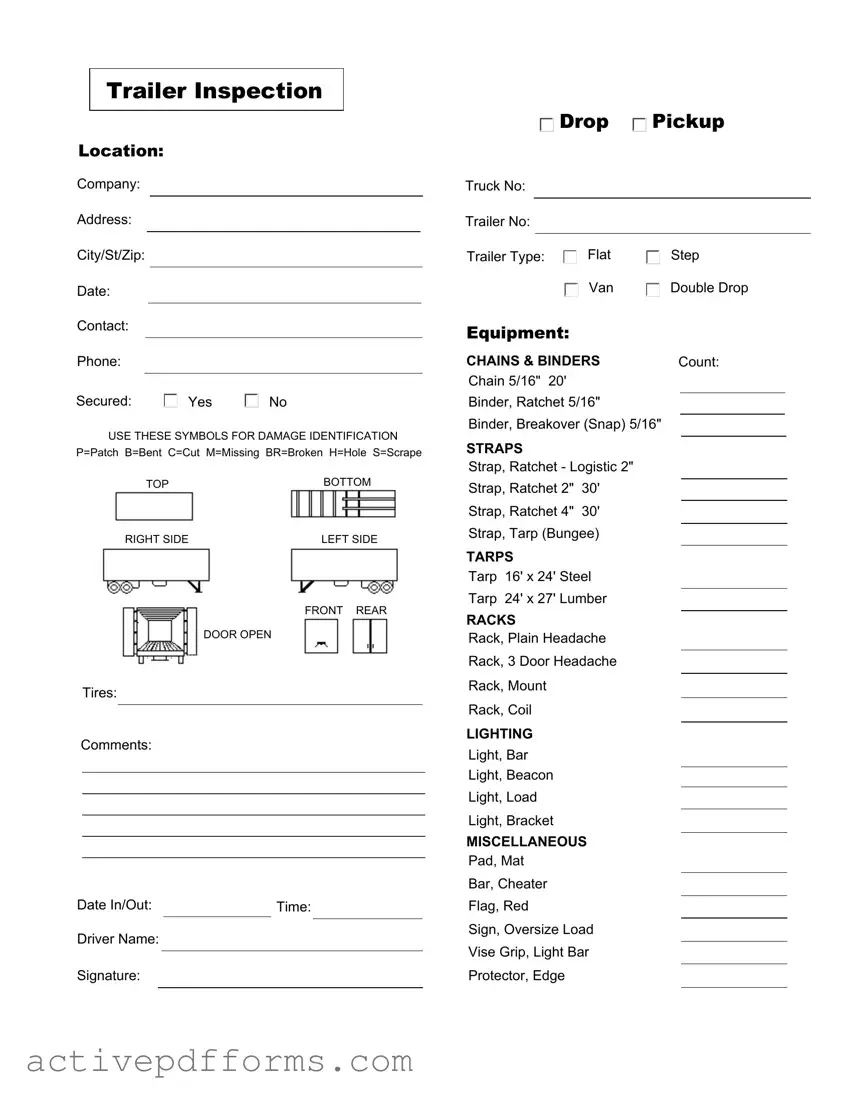
Ensuring the safety and readiness of a trailer for transport involves a meticulous process, as detailed in the Trailer Inspection form. This document serves as a critical tool in assessing the condition of a trailer at both the pickup and drop-off points. It records essential information such as the location, company details, contact information, and specifics about the truck and trailer, including their numbers and the type of trailer and equipment involved. The form facilitates a comprehensive evaluation of various components, from the tires and overall structure to the security of the load, using a standardized system of symbols for identifying different types of damage. Alongside visual inspection areas, it includes sections to note the presence and condition of safety and cargo securing equipment like chains, binders, straps, tarps, racks, and lighting, as well as miscellaneous items such as pads, bars, flags, and signs. By doing so, it not only highlights current or potential issues but also ensures compliance with safety regulations, ultimately protecting both the cargo and those involved in its transportation. The form concludes with spaces for the driver’s name and signature alongside dates and times, underscoring the responsibility of the individuals involved in this crucial process.
Trailer Inspection
Location:
Drop |
Pickup |
Company:
Address:
City/St/Zip:
Date:
Contact:
Truck No:
Trailer No:
Trailer Type:
Equipment:
Flat
Van
Step
Double Drop
Phone:
Secured: |
Yes |
No |
USE THESE SYMBOLS FOR DAMAGE IDENTIFICATION P=Patch B=Bent C=Cut M=Missing BR=Broken H=Hole S=Scrape
TOPBOTTOM
RIGHT SIDE |
LEFT SIDE |
FRONT REAR
DOOR OPEN
Tires:
Comments:
Date In/Out: |
|
Time: |
|
|
|
Driver Name:
Signature:
CHAINS & BINDERS |
Count: |
|
||
Chain 5/16" 20' |
|
|
|
|
Binder, Ratchet 5/16" |
|
|
|
|
|
|
|
||
Binder, Breakover (Snap) 5/16" |
|
|
|
|
|
|
|
||
STRAPS |
|
|
|
|
|
|
|
|
|
Strap, Ratchet - Logistic 2" |
|
|
|
|
Strap, Ratchet 2" |
30' |
|
|
|
|
|
|
||
Strap, Ratchet 4" |
30' |
|
|
|
|
|
|
||
Strap, Tarp (Bungee)
TARPS
Tarp 16' x 24' Steel
Tarp 24' x 27' Lumber
RACKS
Rack, Plain Headache
Rack, 3 Door Headache
Rack, Mount
Rack, Coil
LIGHTING
Light, Bar
Light, Beacon
Light, Load
Light, Bracket
MISCELLANEOUS
Pad, Mat
Bar, Cheater
Flag, Red
Sign, Oversize Load
Vise Grip, Light Bar
Protector, Edge
| Fact Name | Description |
|---|---|
| Purpose of the Form | The Trailer Inspection form is designed to record the condition of the trailer before and after transportation, which includes the inspection of equipment, tires, lighting, and any secured loads. |
| Detailed Sections | The form contains specific sections for documenting the inspection location, company details, truck and trailer information, equipment used, and a damage identification system using symbols. |
| Damage Identification Symbols | Symbols such as P (Patch), B (Bent), C (Cut), M (Missing), BR (Broken), H (Hole), and S (Scrape) are used for precise damage reporting on various parts of the trailer, ensuring accurate and efficient communication. |
| Additional Equipment Checklist | Includes an extensive checklist for chains & binders, straps, tarps, racks, lighting, and miscellaneous items like pads, bars, flags, and signs to ensure all necessary equipment is accounted for and in good condition. |
| Governing Laws | Governing laws may vary by state; however, most inspection requirements align with federal Department of Transportation regulations to ensure safety on roads and highways. |
Filling out a Trailer Inspection form is an essential step in ensuring the safety and compliance of your trailer before hitting the road. Whether you're doing a routine check or preparing for a specific trip, completing this form accurately plays a critical role in avoiding potential legal issues and ensuring both you and other road users stay safe. Here's a step-by-step guide to help you fill out the form thoroughly and correctly.
Upon completion of the Trailer Inspection form, it's crucial to review all information for accuracy before submission. This document not only serves as a formal checklist for ensuring your trailer's readiness but also as a legal record in the event of any disputes or roadside checks. Properly filling out this form is a step toward responsible driving and adherence to safety regulations. Remember, a well-maintained trailer is paramount to preventing accidents and ensuring a smooth operation on the road.
Welcome to the FAQ section about the Trailer Inspection Form. Here, we answer some of the most common questions to help clarify the process and ensure that your trailer inspection goes smoothly.
What is the purpose of a Trailer Inspection Form?
The Trailer Inspection Form is used to document the condition of a trailer before and after its use. This includes checking for any damages, ensuring that all equipment is accounted for, and verifying that the trailer is safe and secure for transportation. This form helps in maintaining the trailer's condition, ensuring safety on the road, and avoiding possible disputes about the trailer's condition.
How do I fill out the 'Location' section?
In the 'Location' section, you need to indicate whether the inspection is taking place at a drop-off or pick-up location. You'll also provide the name of the company, its address, and contact information. This helps in tracking where inspections are performed and assists in future correspondence if necessary.
What are the symbols used for identifying damage, and how should I use them?
Damage identification symbols on the form include P=Patch, B=Bent, C=Cut, M=Missing, BR=Broken, H=Hole, and S=Scrape. Use these symbols to accurately describe the condition of the trailer in the designated sections, such as the top, bottom, right side, left side, front, rear, and door. This standardized approach helps in clearly communicating the trailer’s condition between parties.
What should I do if I find damage during the inspection?
If you find any damage during the inspection, document it on the form using the appropriate symbols and write detailed comments in the 'Comments' section. It's important to notify the company listed in the 'Company' section immediately, so they are aware of the damage and can decide on the necessary actions to be taken.
Do I need to inspect and document the condition of tires?
Yes, inspecting and documenting the condition of the tires is crucial. Under the "Tires" section, provide notes on their condition and any issues you find. Proper tire inspection ensures the trailer’s roadworthiness and overall safety.
How should I account for chains, binders, and straps?
In the sections for chains & binders and for straps, count each item and note it on the form. Specify the type and size, such as "Chain 5/16" 20'" or "Strap, Ratchet - Logistic 2". This helps in ensuring that all securing equipment is accounted for and in good condition, which is vital for safe transportation.
What's the correct way to document lighting and miscellaneous equipment?
For lighting and miscellaneous items, list each piece of equipment, such as "Light, Bar" or "Sign, Oversize Load," and note their condition. Ensuring that all equipment is present and functional is important for compliance with traffic laws and for safety.
How do I sign off on the inspection?
Once the inspection is complete, the driver should print their name in the "Driver Name" section, then sign and date the form in the provided spaces. This formalizes the inspection process and confirms that the inspection was conducted thoroughly.
What if additional comments or notes need to be added?
If additional space is needed for comments or notes, use the 'Comments' section to provide further details about the inspection. If more space is needed beyond this, you can attach a separate sheet with the additional information, making sure to reference it on the form.
Who should keep a copy of the completed Trailer Inspection Form?
Both the driver and the company should keep a copy of the completed Trailer Inspection Form. This ensures that both parties have a record of the trailer’s condition before and after transportation, which can be useful for maintenance records or in case of disputes.
Filling out a trailer inspection form seems straightforward, but it's surprisingly easy to slip up. These forms are essential for ensuring the safety and legality of a trailer's operation, which, in turn, affects everyone on the road. Below are ten common mistakes people tend to make when completing these forms. Paying attention to these areas can help avoid complications and improve the overall inspection process.
Not checking the trailer type accurately: It's crucial to specify the type of trailer being inspected, such as flatbed, van, step deck, or double drop. Each type has unique inspection points that must be thoroughly checked.
Skipping sections that don't initially seem applicable: For example, even if certain equipment like tarps or chains doesn't seem directly relevant at the time of filling, later stages of transport could necessitate these components. Thus, ensuring they are in good condition is key.
Misinterpreting the symbols for damage identification: The form uses specific symbols to denote various types of damage (e.g., P=Patch, B=Bent, C=Cut). Misusing these symbols can lead to inaccurate damage reports, affecting the integrity of the inspection.
Overlooking the importance of the 'Secured' checkbox: Whether or not cargo is secured can significantly impact safety. Failing to accurately report this can lead to dire consequences, including accidents or lost cargo.
Forgetting to detail the condition of tires: Tires are critical for safe trailer operation. Not thoroughly inspecting or incorrectly reporting tire conditions can result in breakdowns or accidents.
Neglecting to input the date and time correctly: The inspection's date and time provide a timeline that is crucial for maintenance and legal purposes. Incorrect information here can lead to issues with compliance and verification.
Incompletely filling out contact information: Should there be any questions or issues regarding the trailer's condition, it's essential that the contact information is filled out completely and accurately.
Failure to specify the accurate number of chains, binders, and straps: These components are vital for securing loads. Miscounting or inaccurately reporting their condition can pose significant safety risks.
Omitting details about additional equipment: Items such as tarps, racks, and lighting equipment are often overlooked but play an important role in safety and compliance. Each item should be checked and accounted for.
Unsigned or undated forms: A form isn't legally binding until it's signed and dated by the inspector or driver. Failing to complete this step can render the inspection invalid.
Steering clear of these common pitfalls can make the inspection process more efficient and significantly enhance road safety for everyone involved. By being meticulous and thorough when completing a trailer inspection form, drivers and companies can ensure that they're in compliance with the law and, most importantly, that their trailers are safe to hit the road.
When dealing with trailer inspections, a thorough check is done to ensure safety and compliance with regulations. The Trailer Inspection form is crucial but working alongside it are various other forms and documents that support a comprehensive overview of the trailer’s condition and its preparedness for the road. Here's a breakdown of six important documents often used in conjunction with the Trailer Inspection form.
Together with the Trailer Inspection form, these documents form a comprehensive documentation package that enhances safety, efficiency, and regulatory compliance in the transport sector. Ensuring that all these forms are properly completed and maintained not only helps in keeping the trailers in good working condition but also safeguards the drivers and the goods they transport.
Vehicle Maintenance Record: The Trailer Inspection form bears a strong resemblance to Vehicle Maintenance Records, as both are designed to document the condition and any maintenance requirements of transportation equipment. Just as the Trailer Inspection form includes a detailed checklist for assessing the trailer's condition, including tires, equipment, and lighting, Vehicle Maintenance Records also chronicle regular check-ups, repairs, and replacement of vehicle parts, ensuring that all components are in optimal working order.
Pre-trip Inspection Checklist: This document is akin to the Trailer Inspection form in its purpose to ensure safety and compliance before a trip begins. The Pre-trip Inspection Checklist is thorough, covering everything from engine checks to safety equipment, similar to how the Trailer Inspection outlines specific areas of a trailer, including the condition of chains, binders, straps, and tarps. Both forms serve as preventative measures, aiming to catch any issues that could lead to safety hazards while on the road.
Equipment Inventory Log: Similar to the Trailer Inspection form, an Equipment Inventory Log is used to track the availability and condition of equipment. While the Trailer Inspection form focuses on the specific items affiliated with a trailer, such as lighting and miscellaneous gear like flags and signs for oversize loads, an Equipment Inventory Log also provides a detailed account of assets, ensuring everything is accounted for and in good condition, which is essential for operational efficiency and safety compliance.
Damage Report Form: Sharing a critical function with the Trailer Inspection form, Damage Report Forms are utilized to document any defects or damages, crucial for maintaining records for insurance and accountability purposes. Both documents contain sections to describe the condition of the item in question, with the Trailer Inspection form specifying different types of damage using symbols (e.g., P for Patch, B for Bent) and areas of the trailer inspected. These detailed records are instrumental in managing maintenance needs and ensuring proper repair procedures are followed.
When filling out the Trailer Inspection form, it's crucial to ensure the process is carried out accurately and thoroughly. Mistakes or omissions can lead to complications down the line, from misunderstandings to potentially hazardous situations. Below are key dos and don'ts to consider during the process.
What You Should Do
What You Shouldn't Do
Understanding the Trailer Inspection Form is vital for both safety and compliance in the transportation industry. However, several misconceptions surround its use and importance. Here are nine common misunderstandings about this form:
It is applicable only at the pickup point: The form is designed for use both at the pickup and drop-off points. It ensures that the trailer's condition is documented before and after transport to identify any damage or issues that may arise during transit.
It's only about checking for visible damage: While identifying visible damage is a crucial component, the form also checks for the functionality of equipment, such as lighting, chains, binders, and straps, ensuring that the trailer is safe and secure for transport.
The form is the same for all types of trailers: Different types of trailers, including flat vans, step decks, and double drops, have specific inspection requirements. The form must be adaptable to accurately reflect the inspection of different trailer types.
It's unnecessary for short trips: Regardless of distance, inspecting the trailer is essential. Short trips do not preclude the possibility of damage or the need for ensuring that the trailer is secure and functional.
Driver signature is optional: A driver's signature is not an optional part of the form. It serves as a formal acknowledgment of the trailer's condition and the completion of the inspection, holding parties accountable.
Using the provided symbols for damage identification is optional: Utilizing the specific symbols (e.g., P for Patch, B for Bent) provided for damage identification ensures a standardized way of recording issues. This standardization helps in accurately communicating the trailer's condition across different parties involved.
Inspection details are only needed if there's visible damage: Completing the inspection details thoroughly is necessary, even if no damage is visible. This comprehensive documentation can serve as evidence of the trailer's condition at the time of the inspection, which can be crucial in the case of later disputes.
Only external features need to be inspected: Both external and internal features, such as the functionality of doors and the condition of interior equipment, are critical to inspect. This ensures not just the roadworthiness of the trailer, but also the safety and security of the cargo.
The inspection form is a mere formality: Beyond being a regulatory requirement, the inspection form plays a vital role in maintaining safety standards. Proper use of the form can prevent accidents and incidents resulting from equipment failure or unsecured cargo.
Correcting these misconceptions is essential for ensuring the safety, legality, and efficiency of the transportation of goods using trailers. By placing emphasis on these areas, companies and drivers can significantly contribute to road safety and cargo security.
When dealing with trailer inspections, attention to detail is not just beneficial; it's essential. Filling out and using a Trailer Inspection form properly ensures that all parties are informed about the condition of the trailer, which can prevent accidents, identify necessary repairs, and maintain compliance with safety regulations. Here are key takeaways to consider:
By meticulously completing each section of the Trailer Inspection form, stakeholders can ensure that trailers are roadworthy and compliant with regulations, thereby protecting not only their assets but also the safety of drivers and the general public. This diligence also helps in keeping maintenance and repair costs down by promptly addressing minor issues before they become major problems.
Mobile Home Listing Agreement - The agreement sets out the legal obligations of the seller regarding the accuracy of the mobile home and park information provided.
Hvac Meaning - Verification of fans includes examining their control sequence and condition, alongside measuring and comparing indicated and actual temperatures of supply, mixed, return, and outdoor air.